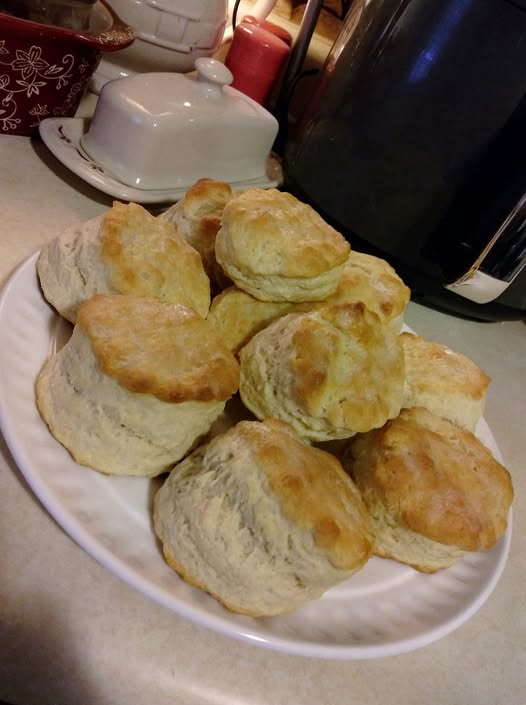
Buttermilk Biscuits Recipe: Flaky Southern Style Homemade Biscuits
The Secret to Sky-High Buttermilk Biscuits
There is a specific kind of silence that fills a kitchen when you are working dough by hand. You can hear the soft rustle of flour and the steady “clack” of a grater hitting a wooden board. Tonight, I am finally sharing the secrets behind my favorite Buttermilk Biscuits.
As a professional baker, I have made thousands of pastries, but nothing beats the humble Southern biscuit. These Buttermilk Biscuits are not your average dinner rolls; they are towering monuments of flaky, buttery goodness. You can smell the tangy buttermilk and toasted flour the moment you open the oven door.
I remember my first shift in a high-volume bakery, learning how to handle cold fats with precision. Furthermore, that experience taught me that the best tools are often just your own two hands. You are going to love how these simple ingredients transform into the most pillowy breakfast treat imaginable.
Why You’ll Love This Buttermilk Biscuits Recipe
-
Incredible Layers: Grating frozen butter creates hundreds of tiny steam pockets for ultimate height and flake.
-
Minimal Cleanup: You can mix this entire dough with your fingers, skipping the messy spoons and whisks.
-
Bold Flavor: The combination of tangy buttermilk and high-quality salt gives these a rich, nostalgic profile.
-
Fast Results: You can have these prepped and in the oven in under fifteen minutes flat.
Bakery-Level Pro Tips for Perfect Texture
In the professional baking world, “cold” is a relative term that we take very seriously. Specifically, for these Buttermilk Biscuits, your butter needs to be rock-solid and frozen before you start. Cold butter is the only way to ensure those gorgeous, distinct layers that shatter when you bite in.
Consequently, if the butter melts into the flour before it hits the oven, you get a cakey texture. Therefore, I always grate my butter directly into the flour to keep it as chilled as possible. This technique mimics the “lamination” process we use for croissants but without all the tedious folding.
Additionally, you must resist the urge to overwork your dough while you are kneading it on the board. Over-handling develops too much gluten, which results in a tough, bread-like biscuit instead of a tender one. Finally, always press your biscuit cutter straight down without twisting to allow the edges to rise freely.
Ingredients You Will Need
-
2 1/2 Cups Cold Self-Rising Flour: This provides the perfect balance of leavening agents and soft wheat protein.
-
1 Full Stick Frozen Butter: Using a high-fat European-style butter will yield the most flavorful and flaky results.
-
1 Teaspoon Fine Sea Salt: This enhances the natural sweetness of the flour and the tang of the milk.
-
1 Cup Ice Cold Buttermilk: The thick consistency and acidity are vital for a high rise and tender crumb.
-
Extra Flour for Dusting: You will need a little extra to keep the dough from sticking to your hands.
USA Substitutions
If you do not have self-rising flour in your pantry, you can easily make a quick substitute. Simply whisk together 2 1/2 cups of all-purpose flour with 3 3/4 teaspoons of baking powder and 1 teaspoon of salt. This mixture will give your Buttermilk Biscuits the lift they need to reach the ceiling.
For the buttermilk, you can use a mixture of whole milk and a tablespoon of white vinegar. However, real buttermilk is much thicker and provides a superior texture for this specific hand-mixed dough. Furthermore, you can use lard or vegetable shortening if you prefer an even more traditional Appalachian-style biscuit.
Step-by-Step Instructions
-
Prep the Flour: Start by placing your cold self-rising flour and salt into a large, chilled mixing bowl.
-
Grate the Butter: Take your frozen stick of butter and grate it directly into the flour using a cheese grater.
-
Incorporate the Fat: Use your fingertips to gently roll the butter shreds around until they resemble small, flour-coated peas.
-
Add the Liquid: Slowly pour in your ice-cold buttermilk while stirring the mixture with your bare fingers.
-
Form a Ball: Stop adding liquid the moment the mixture comes together into a shaggy, wet dough ball.
-
Flour the Surface: Generously dust a clean wooden board or countertop with extra flour to prevent any sticking.
-
Knead Gently: Turn the dough out and fold it over itself a few times to create those signature layers.
-
Pat it Down: Use your hands to pat the dough into a rectangular block about one inch thick.
-
Cut the Biscuits: Press your biscuit cutter straight down into the dough to create your individual rounds.
-
Arrange for Baking: Place the biscuits on a baking sheet, making sure they are just touching for better rising.
-
Bake Until Golden: Slide the tray into a 425°F oven and bake for approximately 25 minutes.
-
The Final Look: Remove them when the tops are a deep golden brown and the sides look flaky.
Storage, Freezing, & Reheating
To maintain the best texture, store your Buttermilk Biscuits in a bread box or a loosely sealed bag. They will stay fresh for about two days at room temperature before they begin to dry out. Indeed, they are best enjoyed within an hour of leaving the hot oven.
If you want to freeze them, wrap the unbaked biscuit rounds in plastic wrap and store them in a bag. You can bake them directly from the freezer; just add five extra minutes to your total baking time. This is a great way to have fresh bakery-style treats on a busy weekday morning.
To reheat leftover baked biscuits, I highly recommend using a toaster oven or a standard oven at 350°F. Wrap them in foil to prevent the edges from burning while the centers get soft and warm again. Avoid the microwave, as it will make the delicate crust feel chewy and tough.
Frequently Asked Questions about Buttermilk Biscuits
Why didn’t my biscuits rise very high? This usually happens if your leavening agents are old or if you twisted the cutter while pressing down. Twisting seals the edges of the dough and prevents the layers from expanding upward.
Can I use a rolling pin for this dough? You can, but using your hands is better for maintaining the cold temperature of the butter. Furthermore, your hands allow you to feel the texture of the dough so you don’t overwork it.
Should I brush the tops with butter before baking? While not strictly necessary, brushing the tops with melted butter halfway through baking adds a beautiful shine. It also helps the crust become even crispier and more flavorful.
Ingredients
Method
- Preheat your oven to 425°F (220°C).
- Place the cold self-rising flour and salt into a large mixing bowl.
- Grate the frozen butter on a cheese grater directly into the flour mixture.
- Toss the butter shreds in the flour with your hands until they resemble small peas.
- Add the ice-cold buttermilk slowly, stirring with your fingers until a wet ball forms.
- Turn the dough out onto a well-floured surface.
- Knead the dough gently into itself a few times to build layers.
- Pat the dough down into a block that is exactly one inch thick.
- Use a biscuit cutter to cut rounds, pressing straight down without twisting.
- Place biscuits on a baking sheet and bake for 25 minutes until golden brown